The most recent lessons can now be found at the top.
Lesson 4 will be updated weekly and move towards the top each time.
Distance Learning Project 1
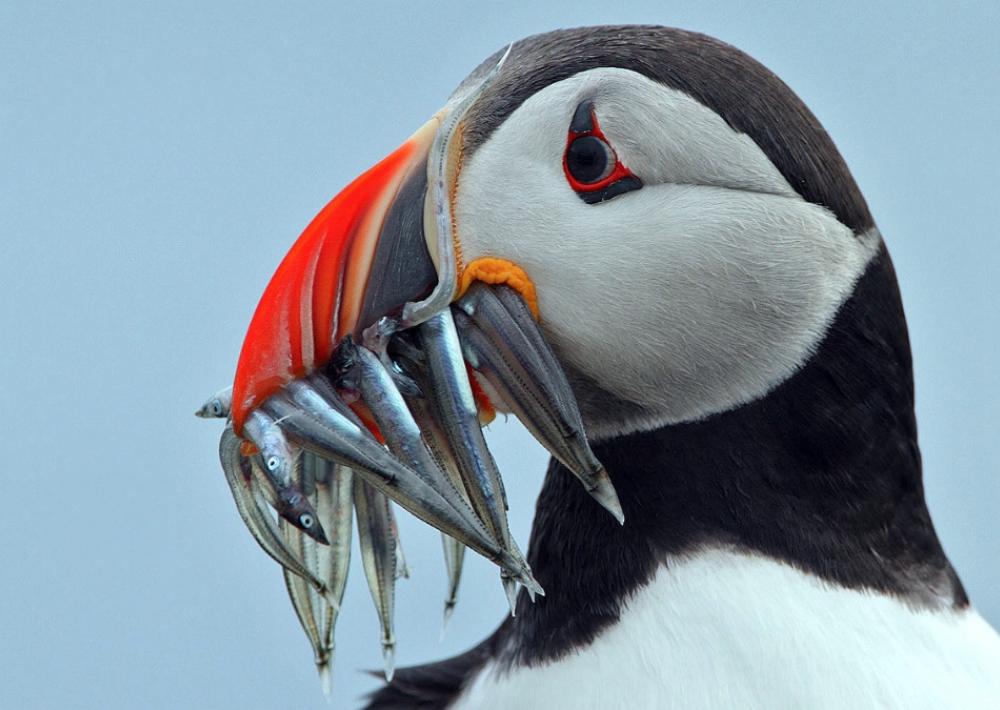
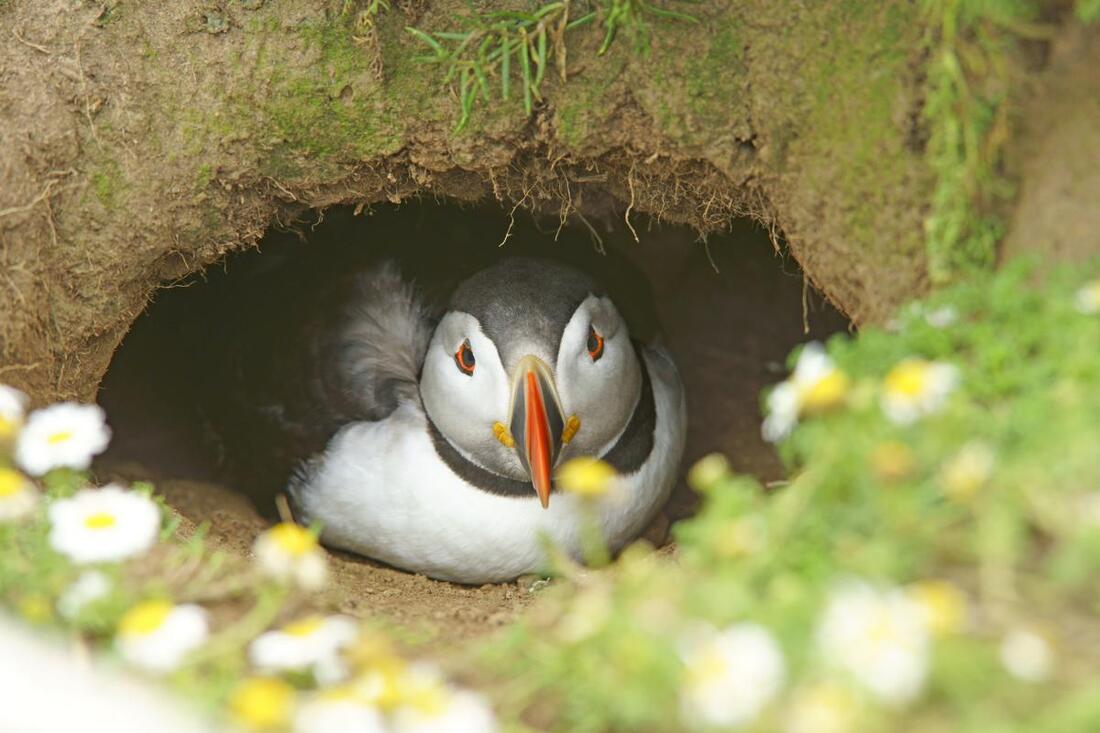
Puffins - What Do Animals Have To Survive?
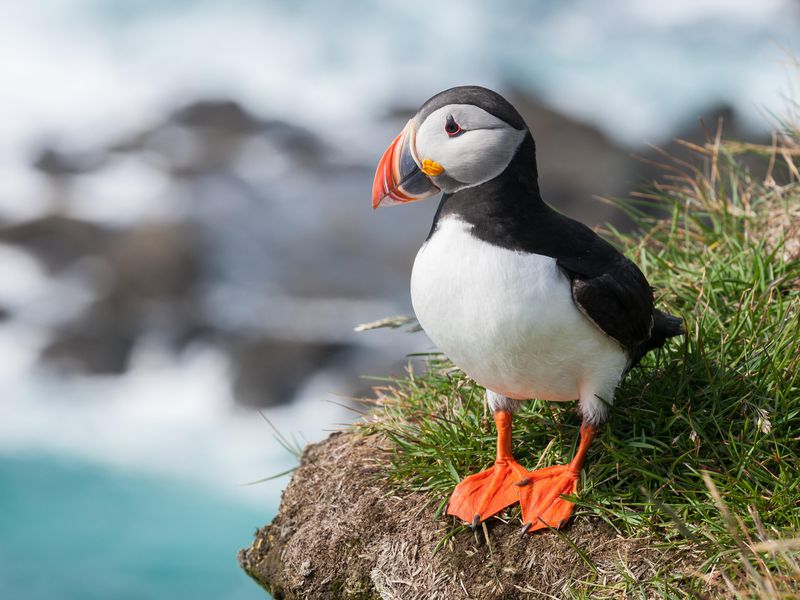
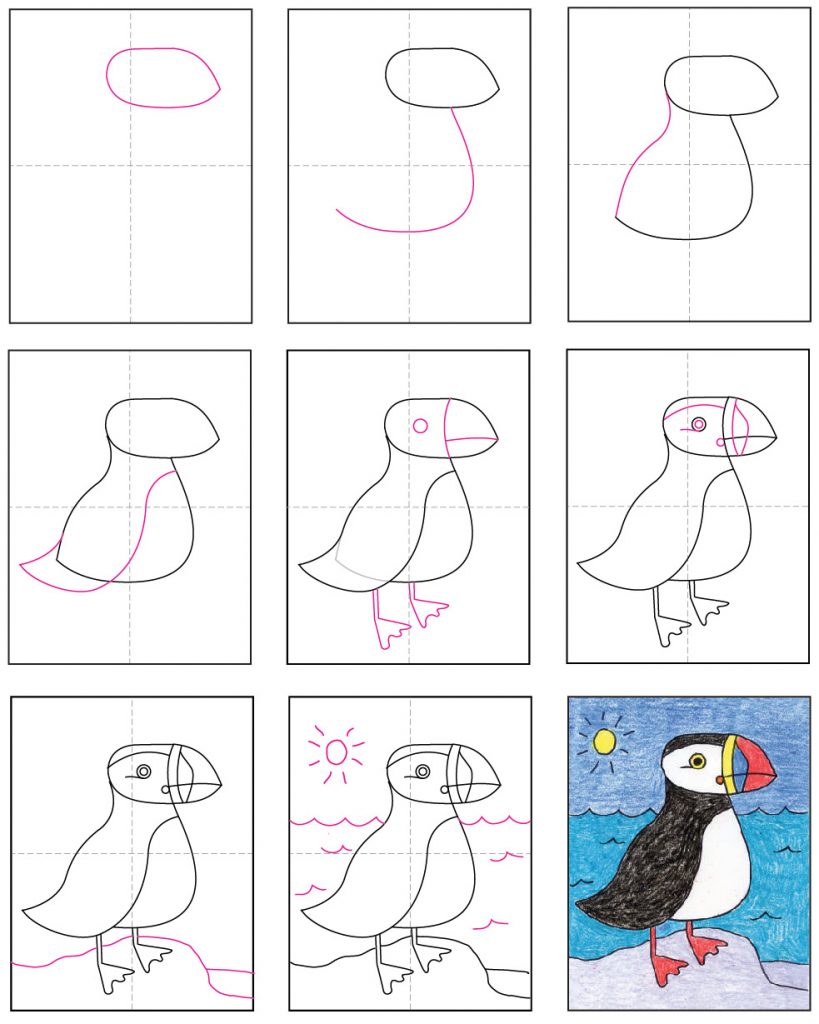
Today you will be drawing a puffin!
A puffin is a small bird that lives on the rocky coasts of the ocean.
If puffins live on rocks, then where do they live and what do they eat?
Trees can't grow on such rocky areas, so they can't eat fruit of trees or have nests in trees either.
Well, if they live by the ocean, they must eat... Fish!
And if they can't build nests in trees, then they must... burrow underground!
|
|
Puffins, like all animals, have tools to help them live.
Does a puffin use a fish rod to catch fish? Haha, no! It uses its large beak to catch many fish at once.
Does a puffin use a tiny shovel to dig its burrow? Also, no! It uses its large feet and beak to dig their homes.
Below, you can find steps to help you draw a puffin. You can change any part of your drawing, and it doesn't need to match the example. If you have a better idea for the background, the puffins looks, or adding other fun details, then please make your drawing how you'd like.
Lesson 11
May the Fourth Be With You!
|
Happy Star Wars Day! Below you can find links to videos on how to draw different Star Wars characters. Or, you are welcome to draw other characters or things from Star Wars or your own favorite movies.
How to draw a Porg How to draw Baby Yoda How to draw Luke Skywalker How to draw the Mandalorian How to draw a Stormtrooper How to draw Padme Amidalla How to draw Yoda How to draw an X-Wing How to draw an AT-AT Walker How to draw Babu Frik Happy drawing! May the force be with you! |
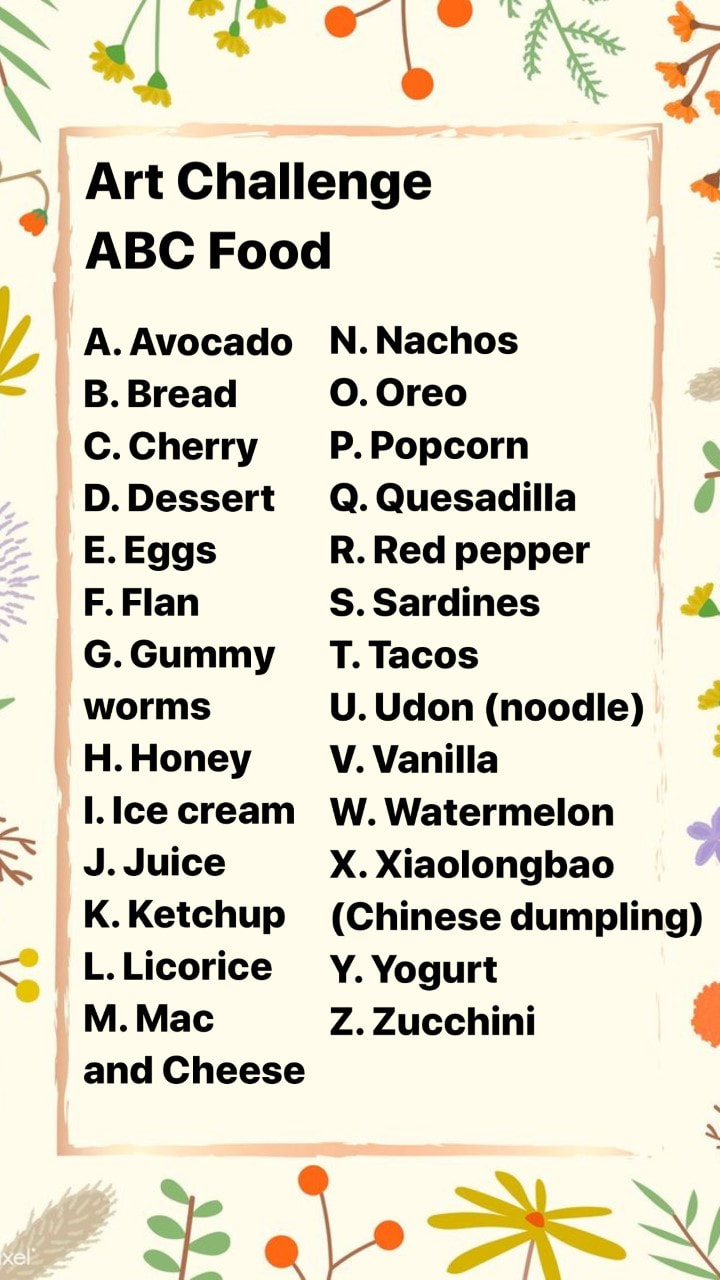
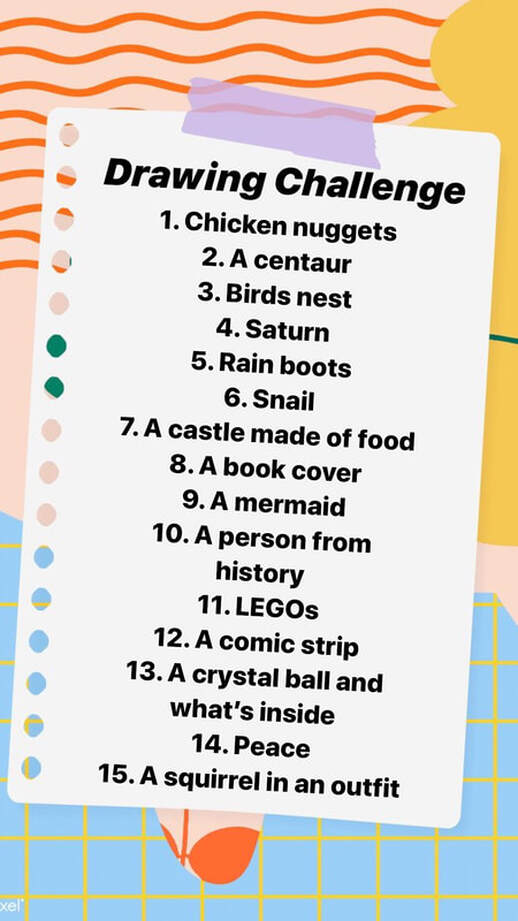
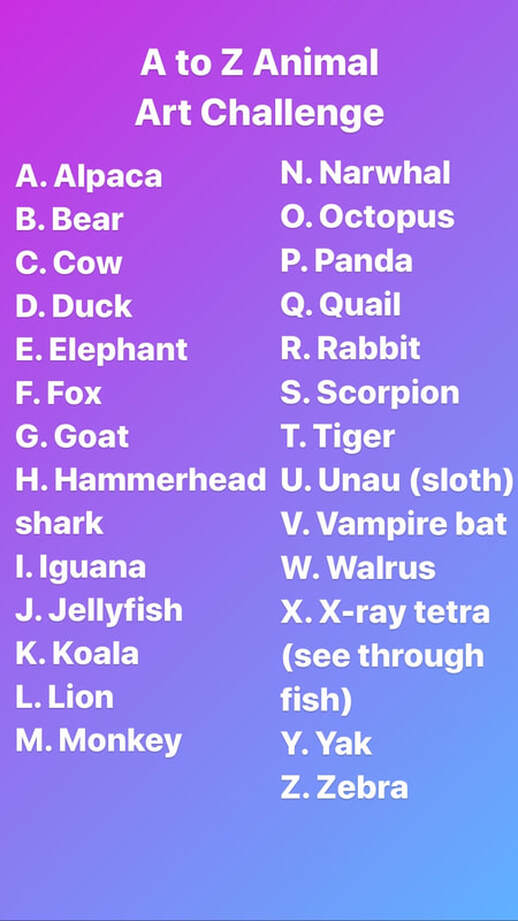
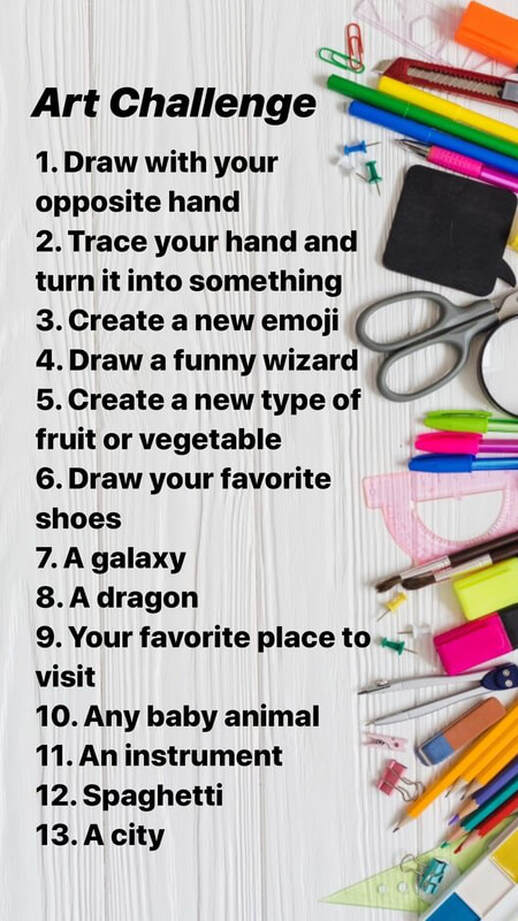
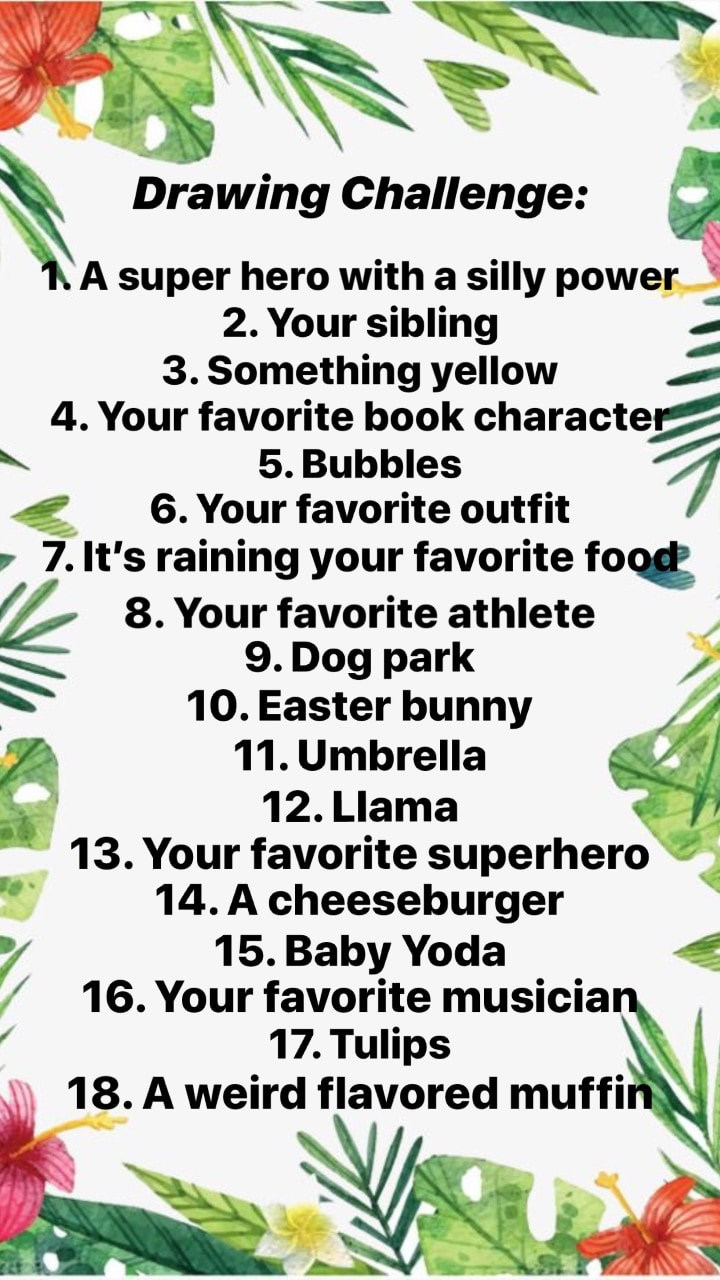
Updated on 5/6. Weekly Drawing (Lesson 4)
Art Choice
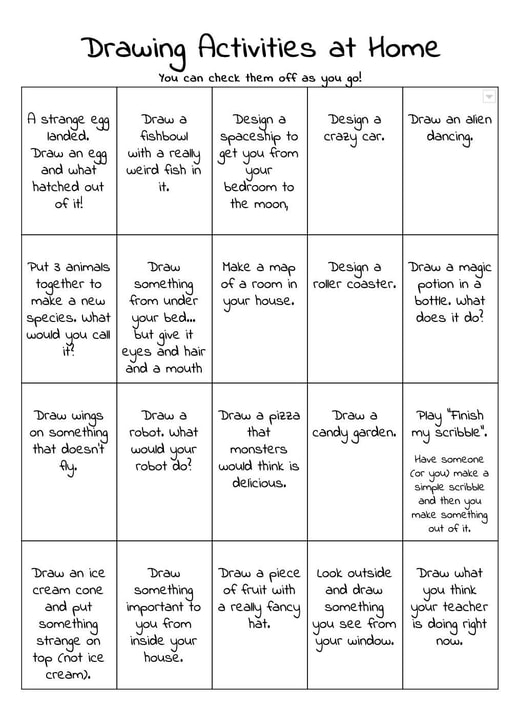
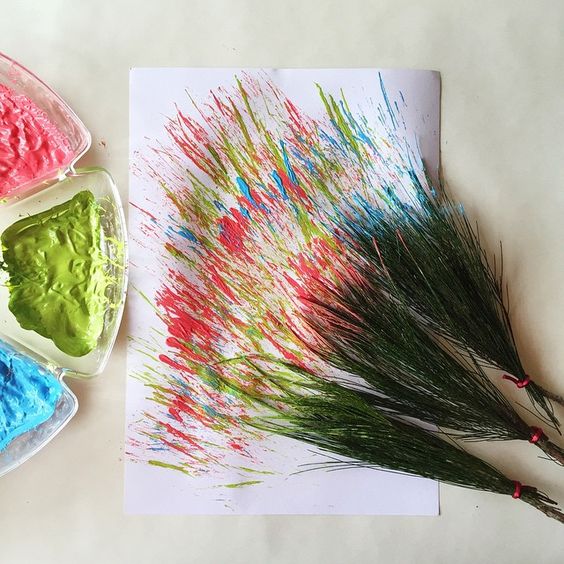
Below you can find multiple art challenges. You are welcome to draw, build out of clay or legos, or however you'd like to create the challenge.
Please choose 1-2 art activities per week.
Email me your progress! I can't wait to see it.
If there is something you would like to draw that is not listed, then take it as a free draw!
Please choose 1-2 art activities per week.
Email me your progress! I can't wait to see it.
If there is something you would like to draw that is not listed, then take it as a free draw!
|
|
Lesson 10
Your Favorite Song into Art!
|
What does your favorite song look like?
To start this project, I want you to listen to your favorite song with your eyes closed. What did you see? Colors? A story? The band playing? Yourself dancing? What did you feel? Happy, sad, excited, angry, love? You can listen to it as many times as you’d like to help you visualize (picture in your mind) your song. Your art today is what you see when you listen to the favorite song you chose. This can be abstract art, cartoon or comic art, or whatever style you want it to be. You can make your art out of anything you’d like. Play dough, pencil and paper, land art, whatever you feel fits your favorite song best. Here is a video of me creating my favorite song into art: Click Here. Please send me the title and artist of your song when you email me a picture of your art. Want to make this project again with a different song? Go for it! |
|
Lesson 9
Faberge Eggs - A Russian Treasure
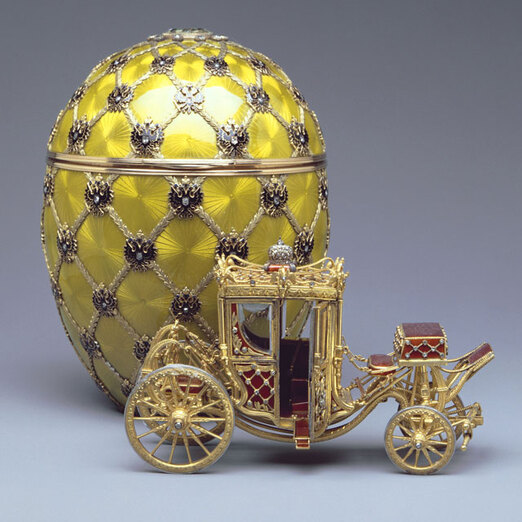
Created between 1885 and 1916 in St. Petersburg, Russia, 69 Faberge Eggs were created for the Russian Imperial Family. These eggs are decorated with gold, rubies, jewels, diamonds, and delicate designs. Some eggs containing mini treasures within. Only 57 Faberge Eggs remain today, their prices ranging from $14,000 to $33 million. Many eggs are still designed to copy the likeness of Faberge Eggs today.
For this project, I would like you to explore a few Faberge Eggs from the Virginia Museum of Fine Art's (VMFA) collection before designing your own Faberge Egg.
Below are two links. The first is a video from me explaining how to use the website and its features. The second link is the museum's website for you to explore.
How to use the website: Miss Rachel's Museum Tour Explanation.
Ready to explore the museum collection yourself? Click HERE.
Want to see more Faberge Eggs like the gold one above? Click HERE.
Time to design!
Think of elements you saw while you explored the collections and use those ideas to design your own Faberge Egg.
Good luck! I can't wait to see your own creation of Faberge Eggs.
Lesson 8
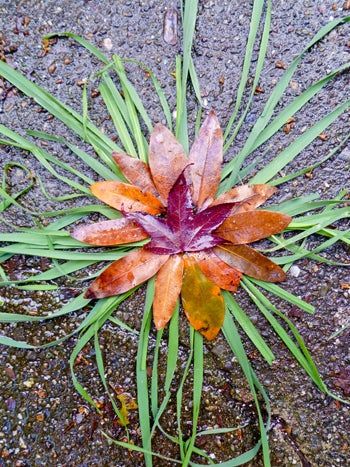
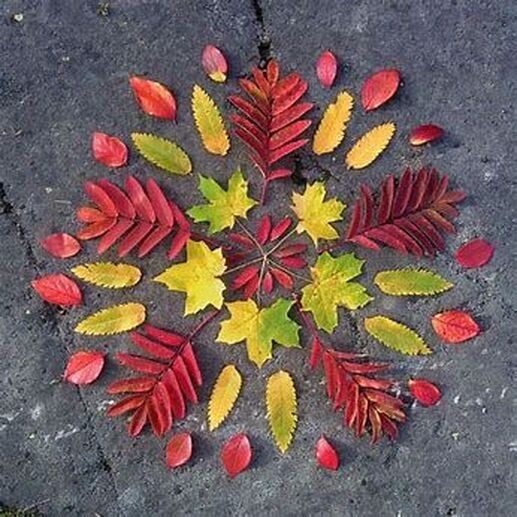
Land Art - Earth Day 2020!
Earth day is on April 22 this year! To celebrate our beautiful planet, I would like to introduce you to Land Art.
Land art is the creation of art, pictures, or sculptures made completely out of nature.
Land art is the creation of art, pictures, or sculptures made completely out of nature.
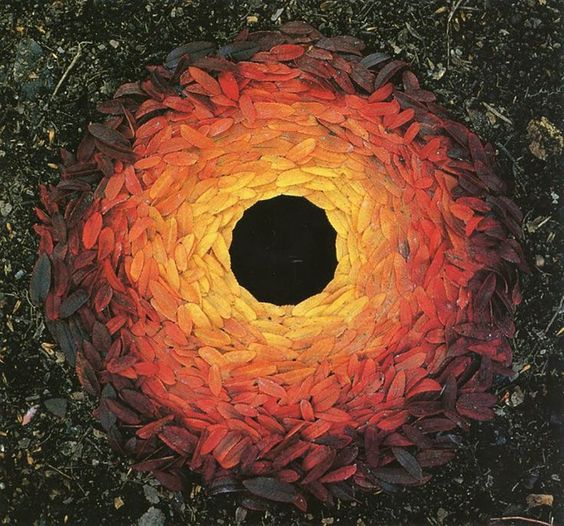
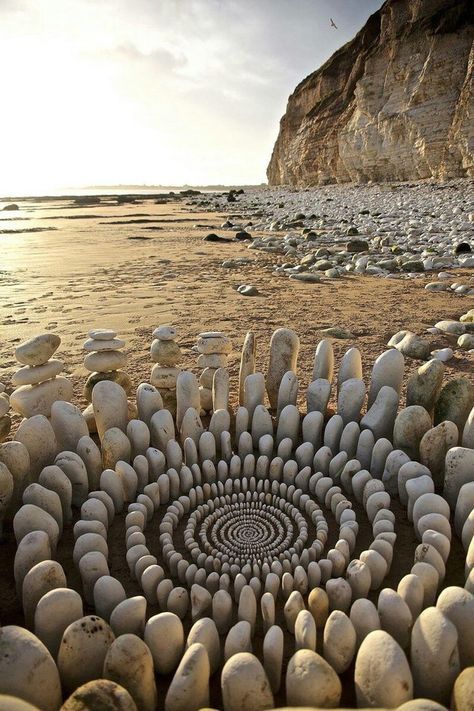
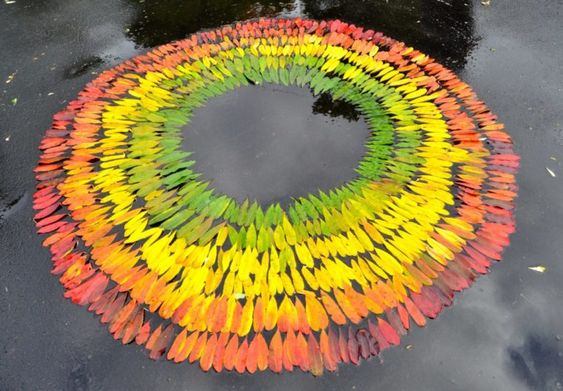
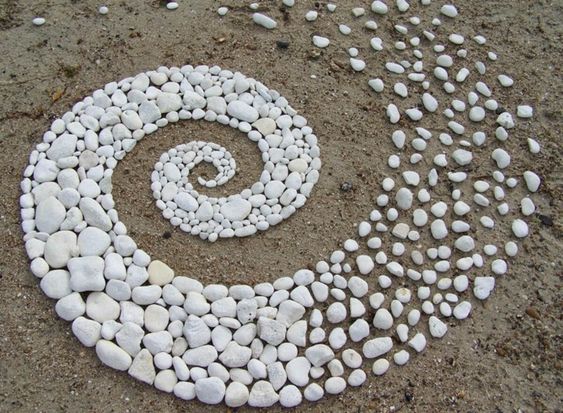
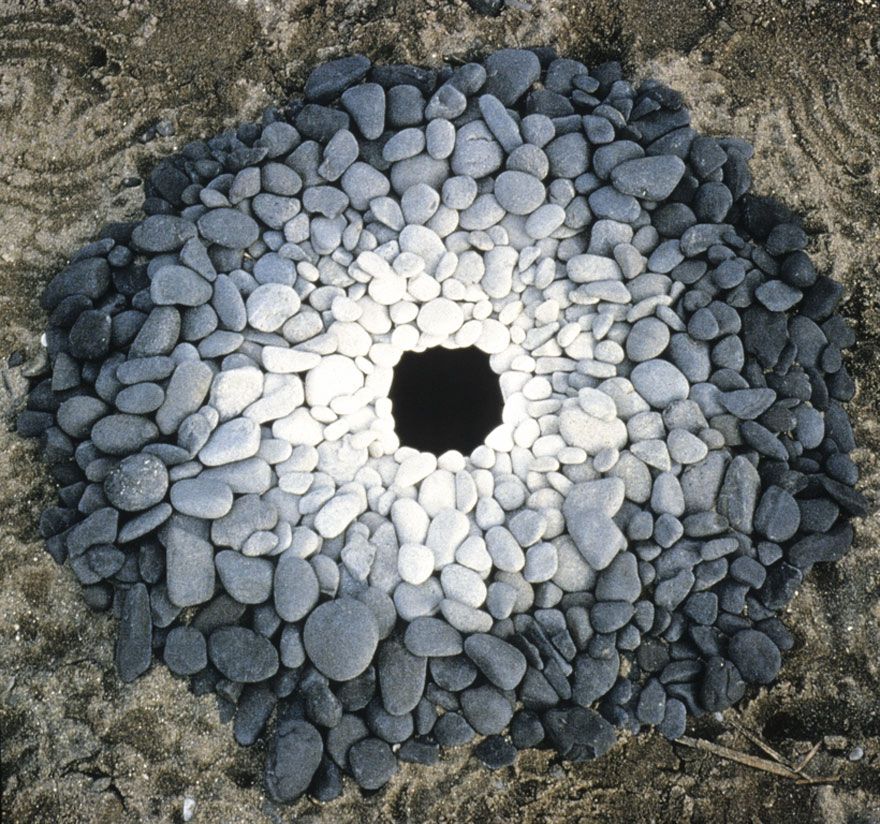
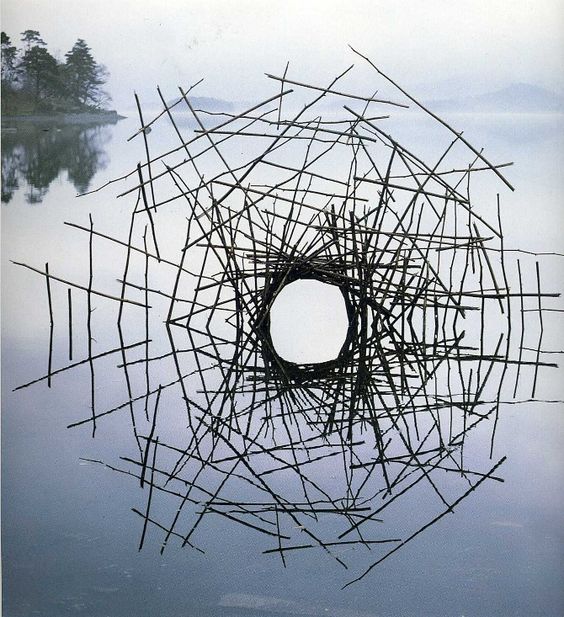
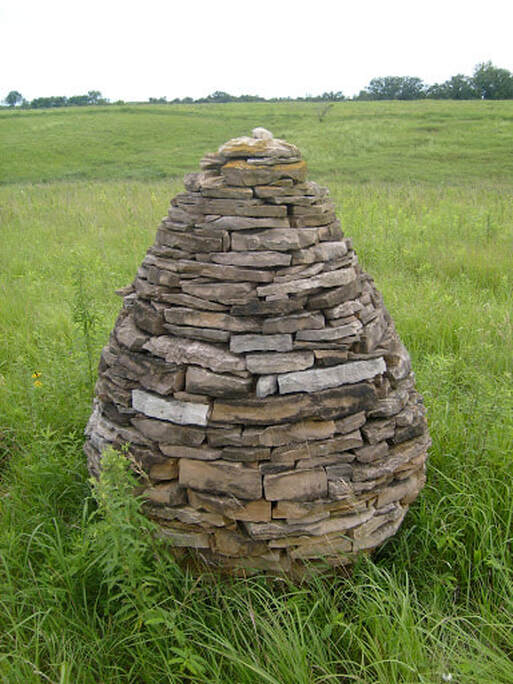
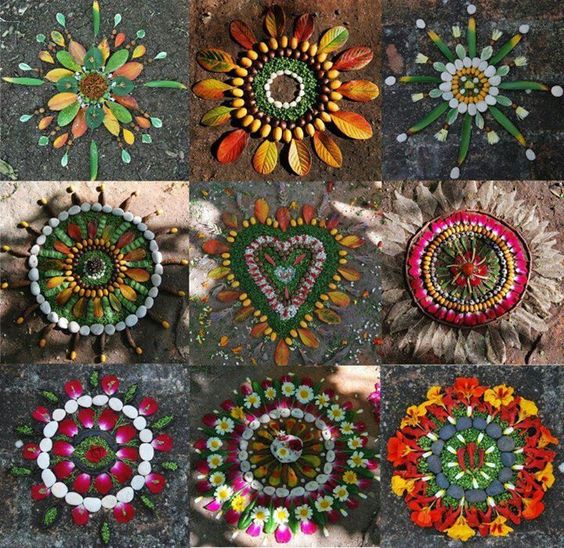
Above is a piece of land art by artist Andy Goldsworthy made only with leaves and dirt. He creates natural art, imagery, and sculptures out of leaves, rocks, sticks, and occasionally ice and snow. Below you can find more of his land art creations.
|

|
Andy Goldworthy's land art is meant to stand as long as nature lets it. Many times, his pieces fall apart as he is making them. When he creates art with leaves in water, it only lasts seconds before being swept up in the waters current and torn apart.
Your Assignment:
Your land art piece can include anything from nature: leaves, dirt, rocks, grass, twigs, or anything else that comes from nature that you can easily find outside.
Please DO NOT take flowers and plants from anyones garden without permission.
Feel free to make this project with your siblings or family if you would like.
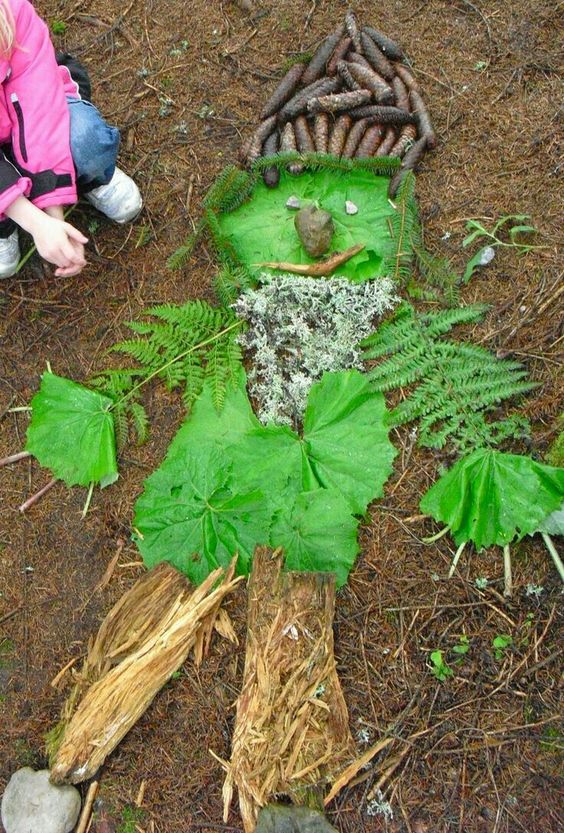
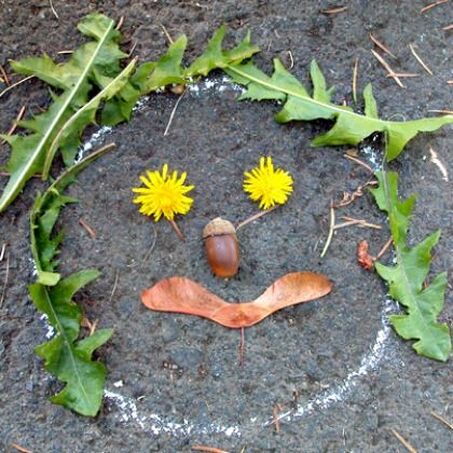
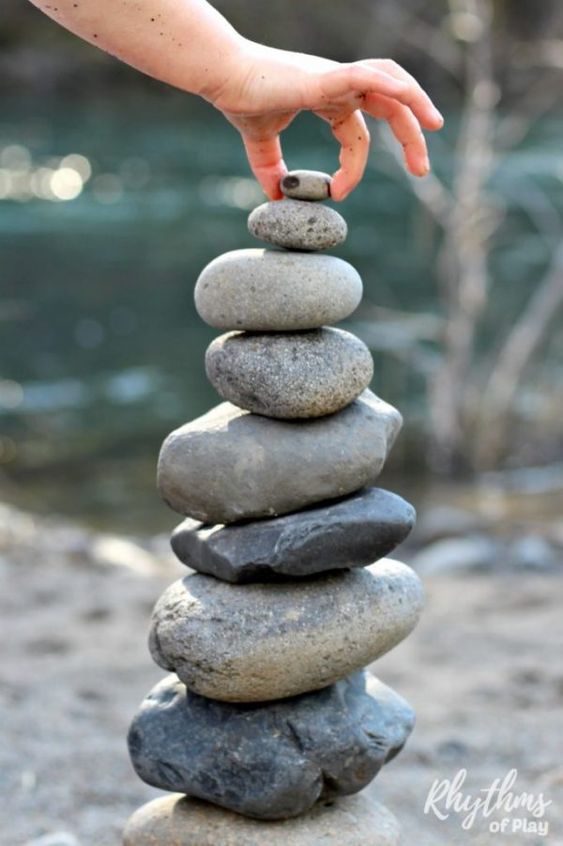
Below you can find examples of land art you can use as inspiration.
As always, I'd love to see your art! So please send it my way.
Enjoy the outdoors and the fresh air!
Your Assignment:
Your land art piece can include anything from nature: leaves, dirt, rocks, grass, twigs, or anything else that comes from nature that you can easily find outside.
Please DO NOT take flowers and plants from anyones garden without permission.
Feel free to make this project with your siblings or family if you would like.
Below you can find examples of land art you can use as inspiration.
As always, I'd love to see your art! So please send it my way.
Enjoy the outdoors and the fresh air!
|
|
Lesson 7
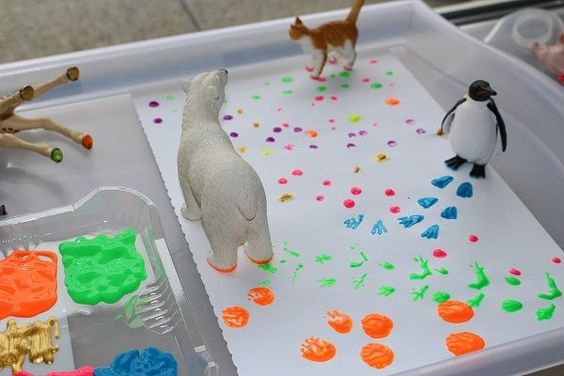
The Crazy Way to Color!
March 27th was National Scribble Day!
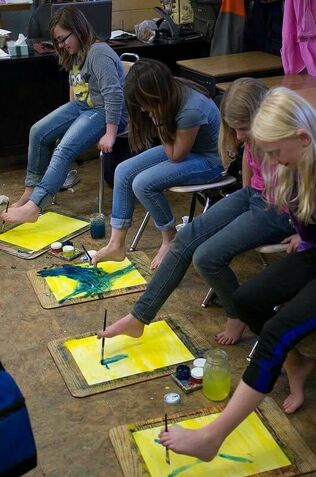
In honor of the craziness of scribbling, it is your job to make a crazy, colorful scribble -- BUT you have to make this scribble using a special method.
This project is about HOW you make it, not what you make.
Try using one of these ways for creating your scribble, or create your own way!
Invite your family to join you too :)
Please send me a picture or video of how you created your scribble.
I can't wait to see how you created your crazy scribbles!
Have a blast!
|

|
Lesson 6
Virtual Museum and Site Tour - Ancient Discoveries
Today you're going on a virtual field trip! Your goal is to relax and learn as you travel in museums and World Heritage Sites.
While you discover new things in the museum, I want you to pick something that you liked and draw it in your style.
Choose any of the links below to explore museums around the world and the artifacts, fossils, and art they hold.
(Please note: 360* means you can grab and drag the screen to look around the museum, or if you are using a smart phone or tablet, then you can turn the phone around the room to change the angle.)
Video Tour:
360* Dinosaur Museum in Alberta, Canada: HERE.
360* Rhomaleosaurus Dinosaur Exhibit in London, England: HERE.
360* Giraffatitan Dinosaur Exhibit in Berlin, Germany: HERE.
360* Chauvet Cave Drawings, The First Art of Humanity: HERE.
Virtual Self-Guided Tour:
360* Chauvet Cave Drawings: HERE.
Enjoy exploring and creating whatever masterpiece you decide!
Lesson 5
Your Choice!
For this project, I want you to create anything you want! You can use pencils, markers, paper, playdough, sidewalk chalk, paint, whatever you want.
The theme for this project is "Happy".
Send me a picture of your creation and please include your name and your teachers name.
Good luck! I can't wait to see your artwork!
The theme for this project is "Happy".
Send me a picture of your creation and please include your name and your teachers name.
Good luck! I can't wait to see your artwork!
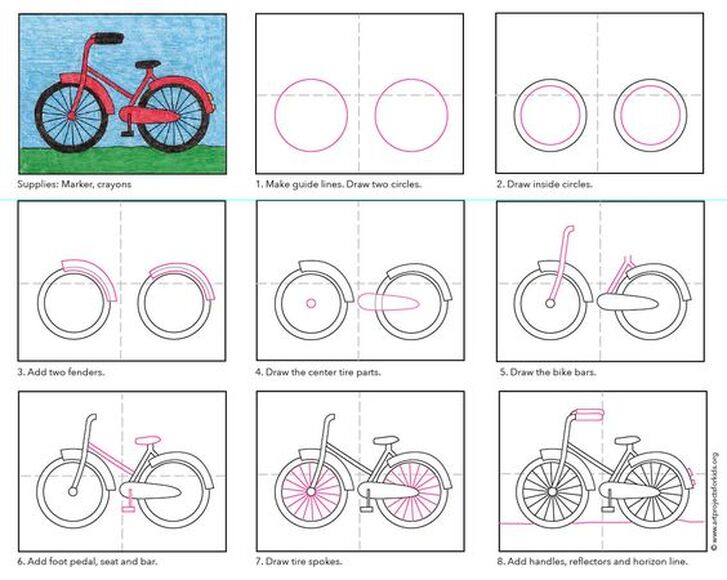
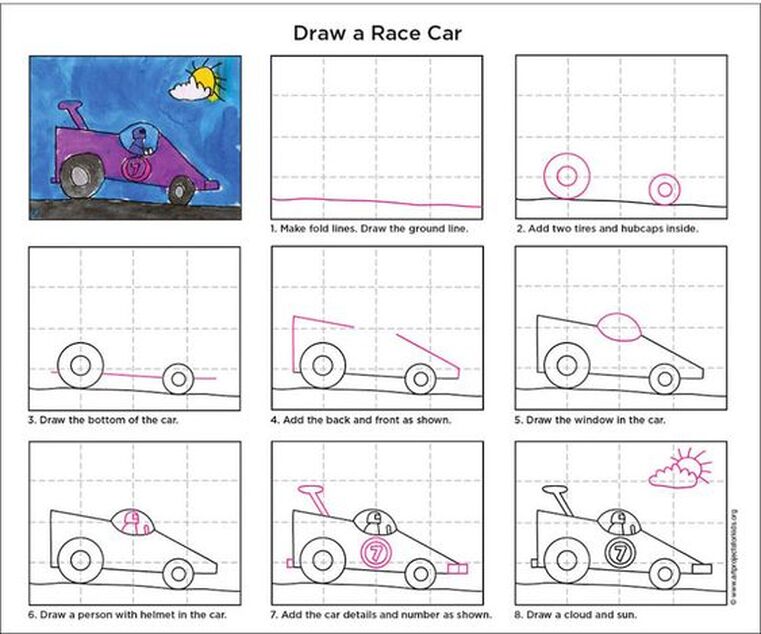
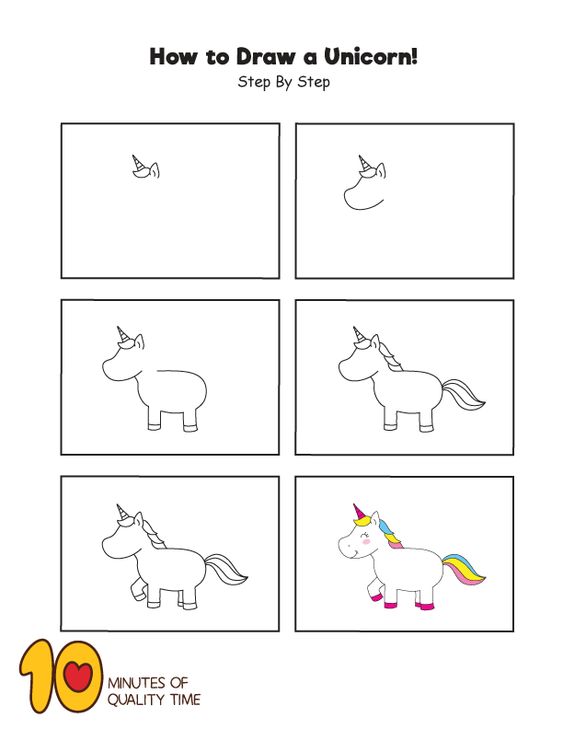
Lesson 3
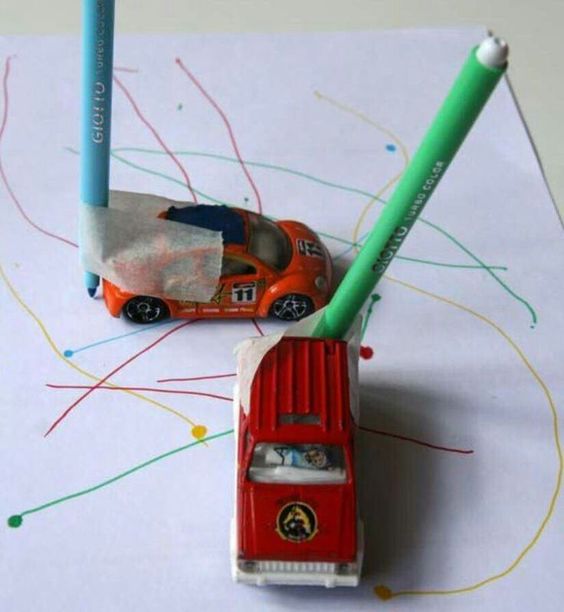
How are you getting there?
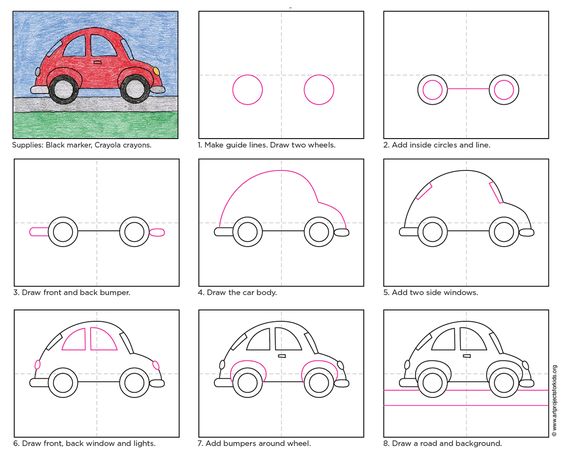
You're traveling! Somewhere exciting. But wait! How do you get there? You don't have anything to travel in or on. But you do have a magic pen! This magic pen will make anything you draw come out of the page.
So, it's time to draw with your magic pen to get you on your journey. Use any materials (markers, pencils, crayons, ink) to draw on a regular sized paper.
What will you draw to get you there? A car? A truck? A plane? It's up to you!
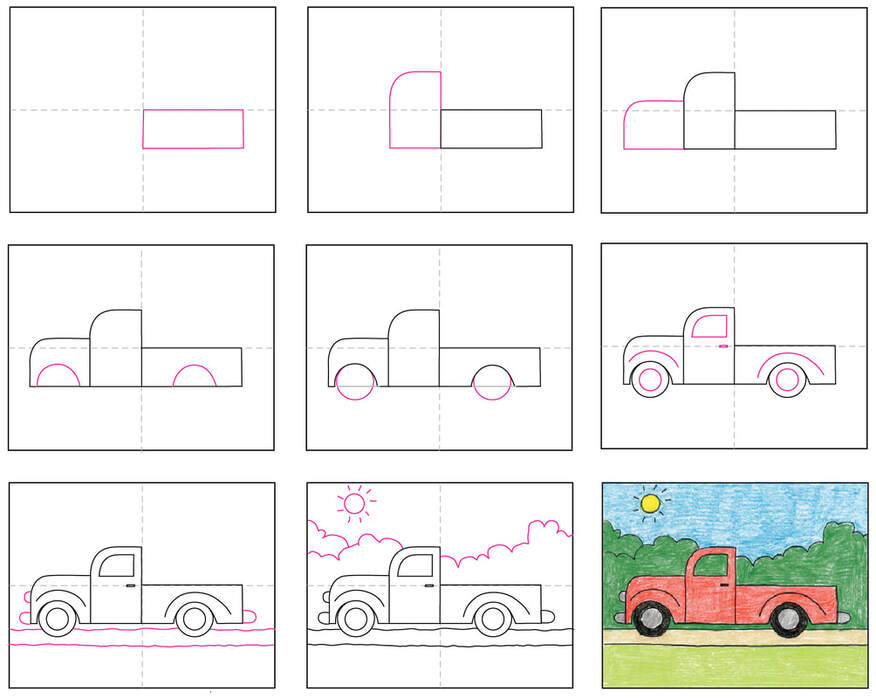
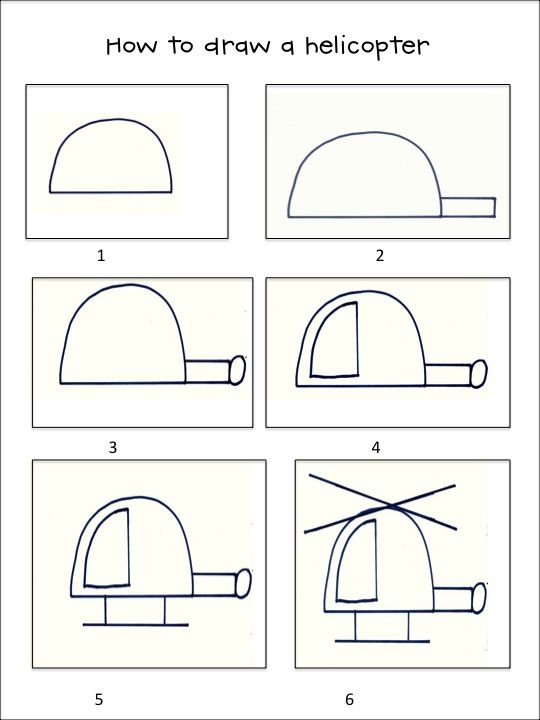
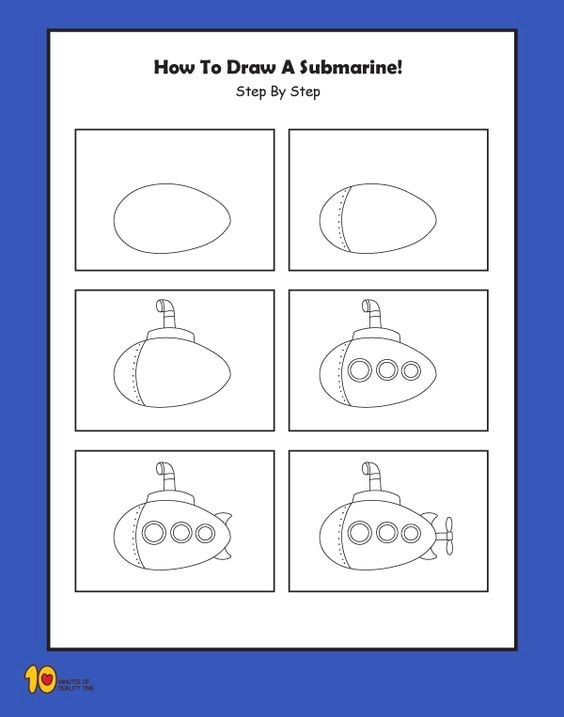
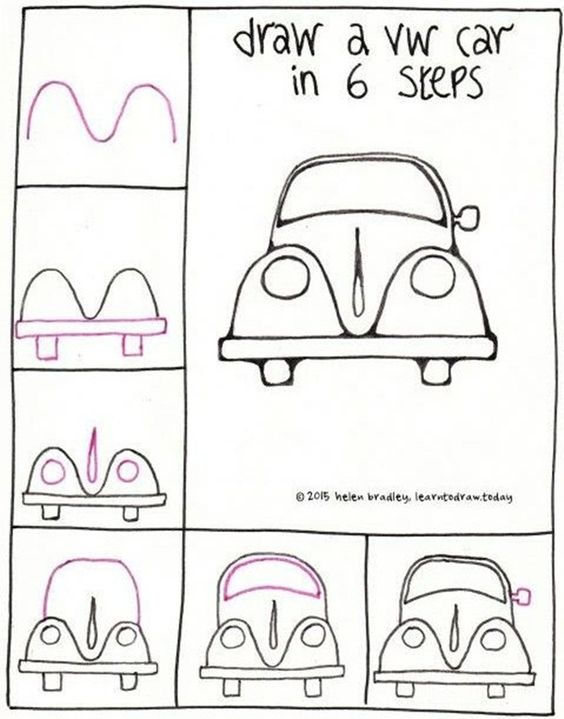
Below you can find 9 "how to's" to help you draw. You do not have to use them, you are welcome to use your imagination to draw whatever vehicle, boat, or creature that will take you on your travels.
Good luck! And send me a picture so I know how you're getting to your destination.
So, it's time to draw with your magic pen to get you on your journey. Use any materials (markers, pencils, crayons, ink) to draw on a regular sized paper.
What will you draw to get you there? A car? A truck? A plane? It's up to you!
Below you can find 9 "how to's" to help you draw. You do not have to use them, you are welcome to use your imagination to draw whatever vehicle, boat, or creature that will take you on your travels.
Good luck! And send me a picture so I know how you're getting to your destination.

Lesson 2
Drawing Upside Down
Today you will be drawing upside down. Below is an image drawn by the artist Pablo Picasso.
Your goal is to focus on shapes and recreate the shapes you see to build the image. You will copy the image from the worksheet upside down on your paper. Yes, you are drawing upside down! Again, focus on shapes. Forget perfection, it's overrated and silly. Go with the flow of your hand and how you make lines, whether they're bumpy, rough, or smooth. Your way of making art is unique, so don't lose that.
Read the instructions on the worksheet.
You will need a pencil (or pen - be aware, you can't erase!) and a standard sized piece of paper (the size of a notebook, or 8x11).
And remember, art failures are good! It means you learned something. And send me a picture of your work when its finished. Check under the "HOME" tab to find "CONTACT", or find it on the home page.

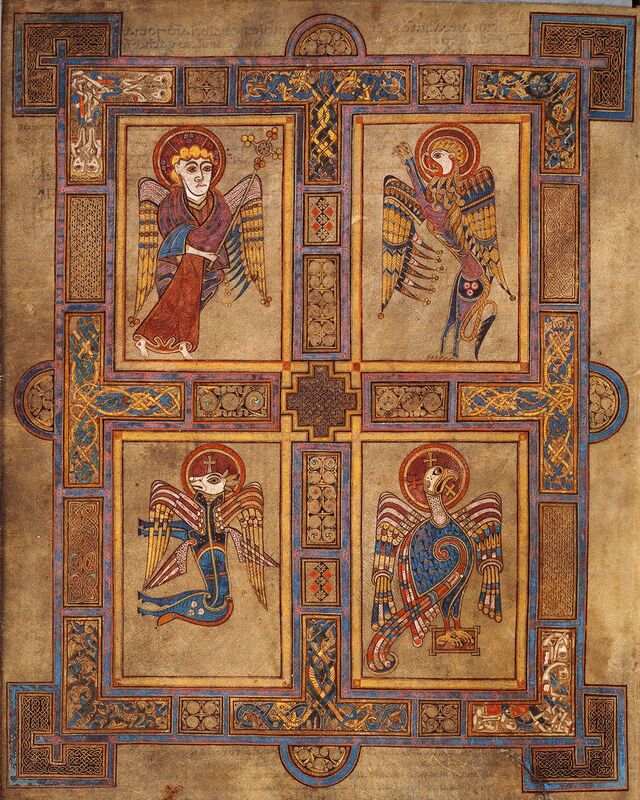
Lesson 1
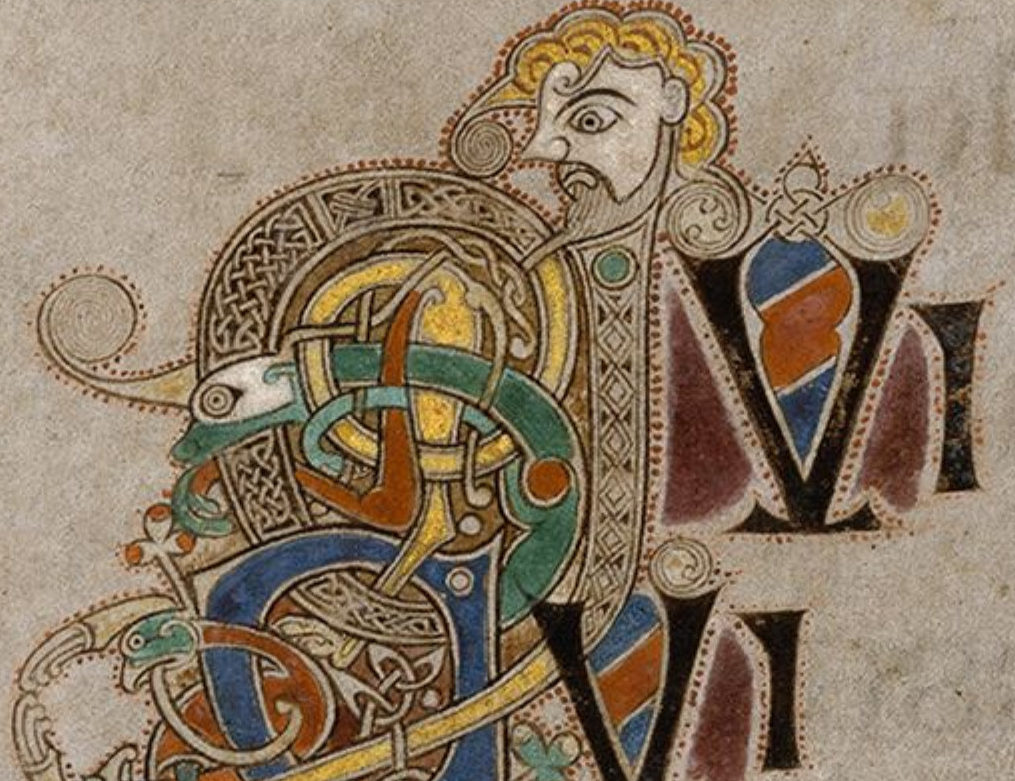
Illuminated Manuscript Letters and The Book of Kells
|
This is my favorite lesson and I'm so excited we get the chance to make it! Before we jump into the art, let's learn about Kells history.
The Book of Kells is an illuminated manuscript. An illuminated manuscript is an old book that was made by monks. How old? Well, the Book of Kells was made in the year 800. So, very old! They were typically made in Ireland, but also in Scotland, England, and other countries in Europe. These books where painted and decorated with mythical creatures, knights in shining armor, angels, and Celtic knots. Their purpose was to tell stories to enlighten and teach the gospels and science. |
Listen to some Irish music while you work:
Mo Ghille Mear (My Gallant Hero) - Choral Scholars of University College Dublin |

This clip will show you how paper, ink, and illuminated manuscript books were made: HERE
Follow these links to read about the Book of Kells:
Quick facts about the Book of Kells
A deeper look into the Book of Kells - more images at the end.
Ten things about the Book of Kells
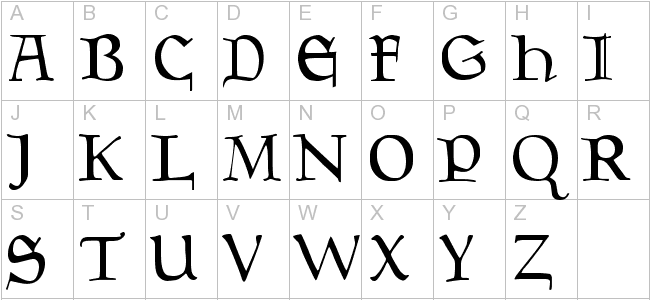
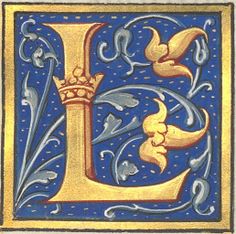
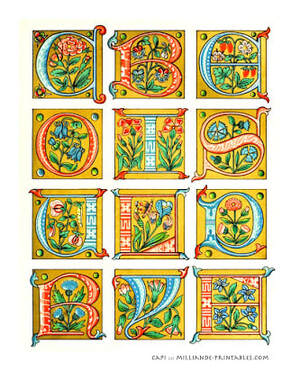
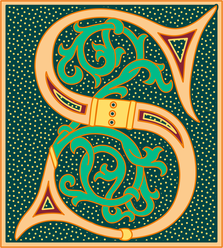
Now, for your project you will be creating an illuminated manuscript initial. An initial is the first letter of something. For your initial, you will choose either the first letter of your first name or the first letter your last name. For example, my name is Rachel Lankford. So I will choose the letters "R" or "L". Choose one (or both if you'd like) of your initials.
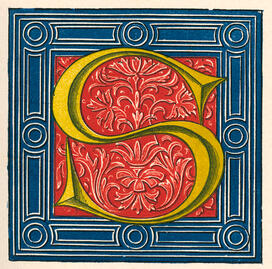
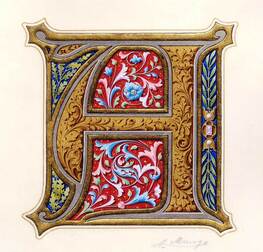
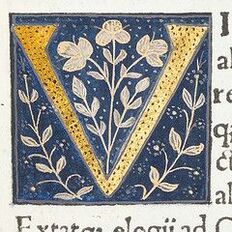
Below are examples of illuminated manuscript letters.
Follow these links to read about the Book of Kells:
Quick facts about the Book of Kells
A deeper look into the Book of Kells - more images at the end.
Ten things about the Book of Kells
Now, for your project you will be creating an illuminated manuscript initial. An initial is the first letter of something. For your initial, you will choose either the first letter of your first name or the first letter your last name. For example, my name is Rachel Lankford. So I will choose the letters "R" or "L". Choose one (or both if you'd like) of your initials.
Below are examples of illuminated manuscript letters.
|
|
|
Finally! Now that you have the history under your belt, you're ready to create your own illuminated manuscript initial.
Please use any materials you have available and, if possible, fill a full sheet of paper. Pencil, then traced in pen or marker, then colored in with pencils, crayons, or any other materials is a great method to create this. However, please do not go buy any special products for this. If your work is in all pencil, all pen, or all crayon, that will work just as well!
Click this link HERE to follow along with the video.
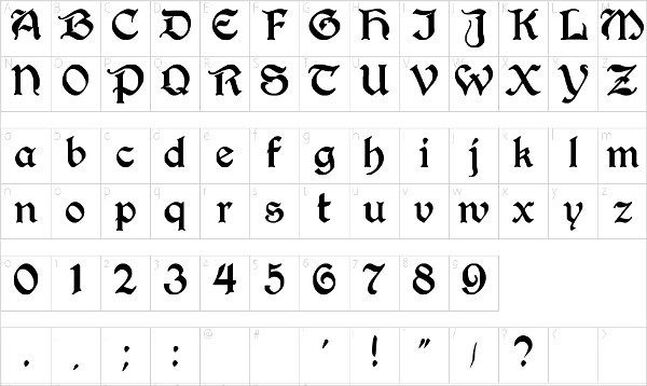
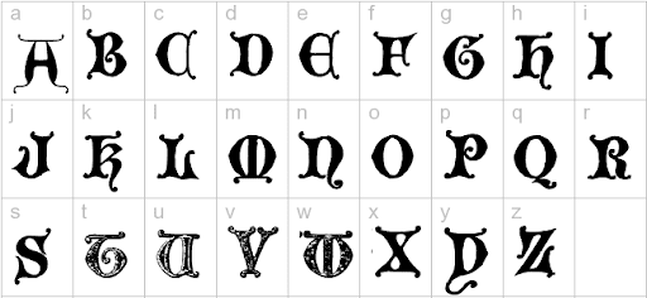
Below are examples of popular fonts throughout illuminated manuscripts for you to copy and decorate appropriately.
Good luck! And I can't wait to see them. Feel free to email me an image of your work. My email is located on the main page and under "Home" and "Contact".
Please use any materials you have available and, if possible, fill a full sheet of paper. Pencil, then traced in pen or marker, then colored in with pencils, crayons, or any other materials is a great method to create this. However, please do not go buy any special products for this. If your work is in all pencil, all pen, or all crayon, that will work just as well!
Click this link HERE to follow along with the video.
Below are examples of popular fonts throughout illuminated manuscripts for you to copy and decorate appropriately.
Good luck! And I can't wait to see them. Feel free to email me an image of your work. My email is located on the main page and under "Home" and "Contact".